Intake Queue
| Feature Access | JMS > Intake > Intake Queue |
| JMS > Monitor > Status Board > Intake Queue | |
| Configuration | Admin > Global > Workflows |
Introduction
The Intake Queue sub-module is designed to manage and monitor inmates progressing through the JMS Intake Workflow, which consists of agency-defined steps required to process an individual into custody. This workflow can only begin after completing the Prebook Workflow and must be finalized before transitioning to the Booking Workflow.
The Intake Queue displays all active records currently in the intake process, sorted by elapsed time since their entry. Expedited records are prioritized at the top of the queue for streamlined processing.
From the Intake Queue, users can:
-
Open an inmate’s workflow to complete intake tasks.
-
Access the Inmate Dashboard for detailed information about the individual.
-
Create and manage inmate-specific notes.
-
Track an inmate’s location, movements, and scheduled events.
The Intake Queue provides all the tools needed to ensure a smooth transition from prebook to intake, with features to manage expedited processing, resolve conflicts, and maintain an accurate record of inmate activity.
Navigating Intake Queue
To access the Intake Queue:
-
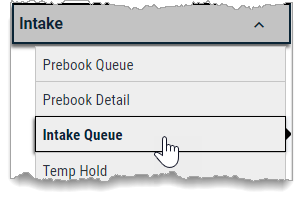
In the navigation panel, click the Expand (
 ) button to expand the Intake options.
-
Select Intake Queue. The Intake Queue page displays. This page displays all persons that have completed Prebook and are now engaged in the Intake process.
The Intake Queue lists the records by elapsed time since they entered the Intake process (descending). If a person in the queue was flagged for expedited processing, they are moved to the top of the list. Expedite rows are also sorted by elapsed time.

-
To open the workflow for an inmate, click in the Intake Progress column for that row, or click the Action Menu (
 ) on the row and select the Intake Workflow option.
The system opens the first incomplete step in the workflow.
Other Options
Access Inmate Dashboard
Click the Action Menu ( ) on the row and select the Inmate Dashboard option. The Inmate Dashboard page opens to display information for the selected inmate.
Create Inmate Note
-
Click the Action Menu (
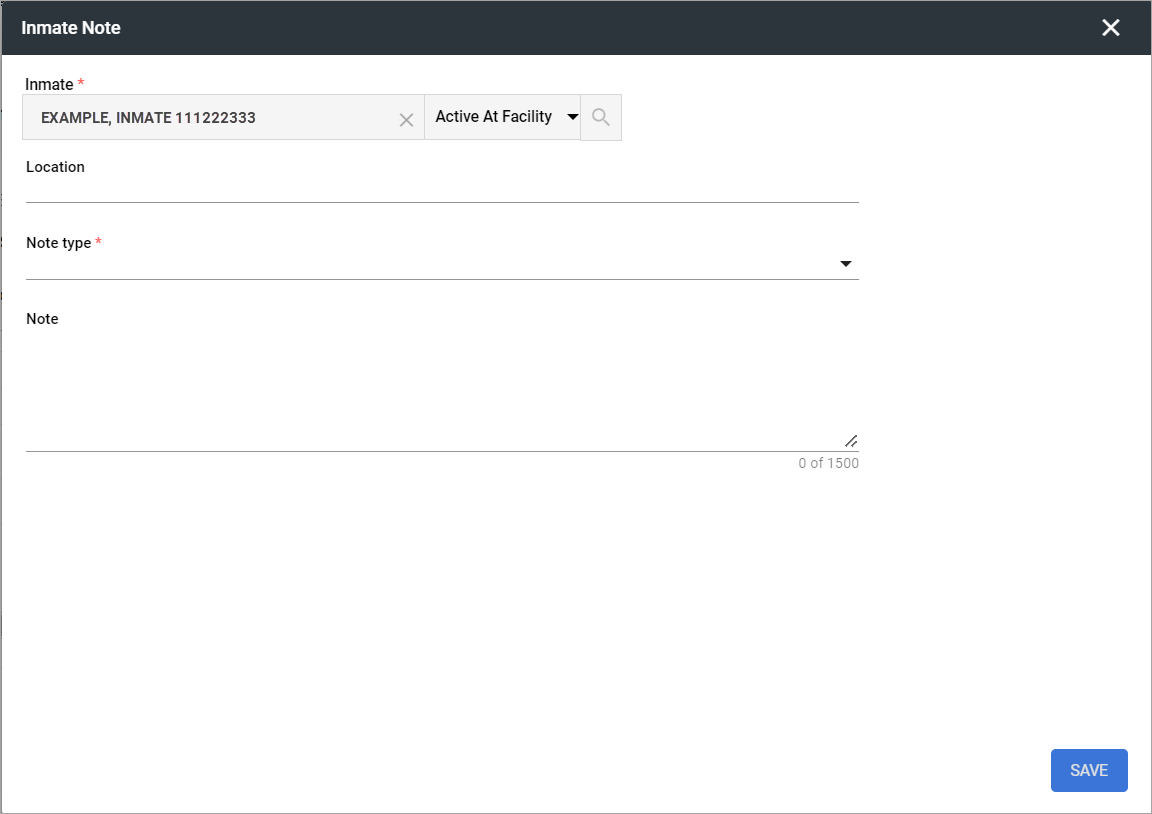
 ) on the row and select the Create New Inmate Note option. The Inmate Note Entry window opens. The Inmate Selector defaults to the current inmate.
The Inmate Note window is used to enter an inmate-specific, free text note about the inmate. It is accessed from various pages of the application and the resulting notes are available on several Viewer pages and from the Inmate Dashboard.

-
(optional) Select a Location if the note is also location-related.
-
Select a Note Type from the agency-defined list of types.
-
(optional) Enter the text of the Note. Character limit is 1500.
-
Click Save. The window closes and the note is saved.
Inmate Notes can be viewed and managed from:
-
Inmate Dashboard > Operations > Notes
-
Facility > Operations > Viewer
-
Facility > Pod Management > Viewer
Track Inmate
Click the Action Menu ( ) on the row and select the Track Inmate option. The Tracking window opens.
The system displays different options and information depending on the current location of the inmate and if they have appointments scheduled for the current date.
-
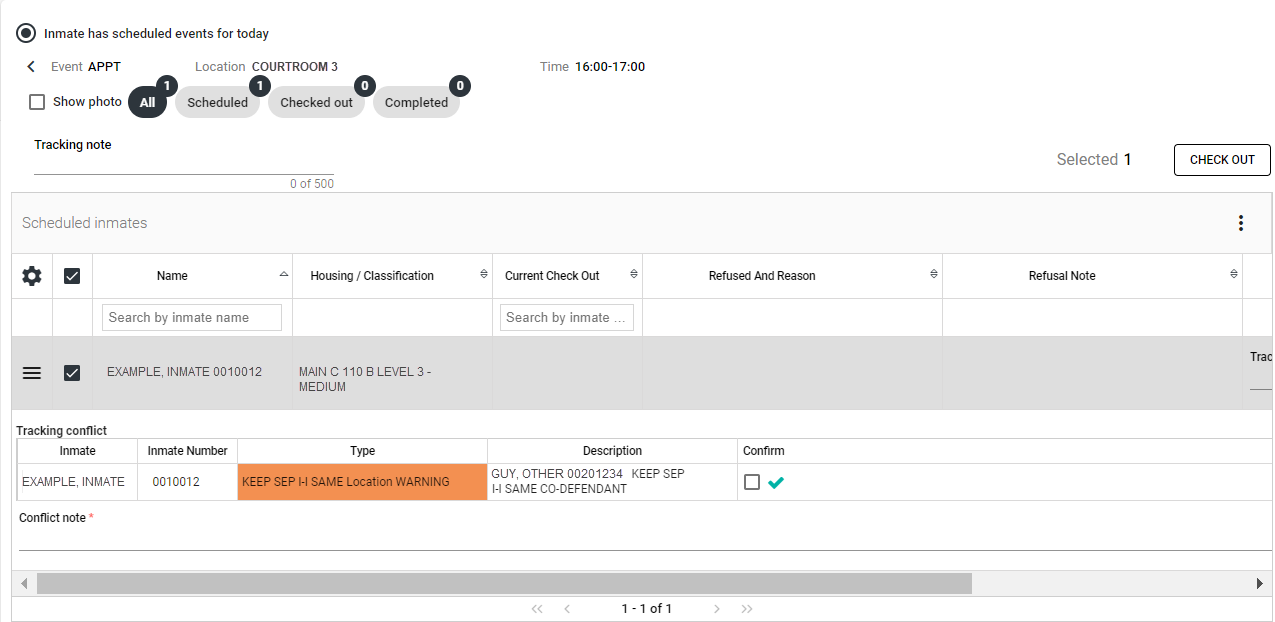
If the inmate has not been checked out to a location and has appointments scheduled for the current date, it displays with the Inmate has scheduled events for today radio button selected and lists the details of each appointment.

-
If the inmate has not been checked out to a location and does not have any appointments scheduled for the current date, it displays with the Create Unscheduled Tracking radio button selected.

-
If the inmate has been checked out to a location for either a scheduled appointment or on an unscheduled basis, it displays the current inmate location and the elapsed time they have been at the location.

Track / Check Out - Unscheduled
To track an unscheduled inmate movement:
-
Select Create unscheduled tracking.
-
Select a location from the Check Out drop-down.
The system runs conflict checks for the location (e.g. capacity) and the inmate (e.g. Keep Seps) and also checks for any conflicts with scheduled appointments. Conflicts are displayed below the Tracking Note field.
If the selected location is configured to allow an inmate to refuse the movement and to track the refusal, the Refused check box is enabled.

-
(optional) Select a Tracking reason.
-
(optional) Enter a Tracking note.
-
If any conflicts are displayed, review them carefully. Resolve or address the conflicts as needed, and then select the Confirm check box for each conflict to proceed. Provide a Conflict Note to document the resolution or reasoning for proceeding.
-
Click Check Out. The page refreshes to display the checkout location and elapsed time. The same information is also displayed in the location area of the Inmate Header.
To record a refusal (if available) rather than a successful check out:
-
Select the Refused check box next to the Tracking reason. A (refusal) Reason drop-down and Refused button display. The Check Out button is now hidden.
-
Select a Reason from the drop-down. This is required.
-
Click Refused. The Tracking page refreshes and the refusal is recorded in the inmate tracking history. The inmate location is NOT updated.
Track / Check Out - Scheduled
To track a scheduled inmate movement:
-
Select Inmate has scheduled events for today.
-
Click in the row for the appointment to which the inmate should be tracked. The system displays inmate and appointment details.
-
Click the check box in front of the inmate name. The system runs conflict checks for the location (e.g. capacity) and the inmate (e.g. Keep Seps) and displays any conflicts below the appointment.

-
If any conflicts are displayed, review them carefully. Resolve or address the conflicts as needed, and then select the Confirm check box for each conflict to proceed. Provide a Conflict Note to document the resolution or reasoning for proceeding.
-
(optional) Enter a Tracking note.
-
Click Check Out. The Tracking page refreshes to display the checkout location and elapsed time. The same information is also displayed in the location area of the Inmate Header.
To record a refusal (if available) rather than a successful check out:
-
Select the Refused check box in the appointment row. The Reason and Note fields are enabled.
-
Select a Refusal reason from the drop-down. This is required.
-
(optional) Enter a Refusal note.
-
Click Check Out. The main Tracking page displays. The refusal is recorded in the inmate tracking history. The inmate location is NOT changed.
Track / Move to New Location
To track an inmate movement from one location to another:
-
Select Move Inmate from the Select a Location drop-down. The page refreshes to display Move location drop-down along with a Tracking reason and Tracking note field.
-
Select a location from the Move location drop-down.
-
(optional) Select a Tracking reason.
-
(optional) Enter a Tracking note.
-
Click Move. The Tracking page refreshes to display the new location and reset the elapsed time. The same information is also updated in the location area of the Inmate Header.
To record a refusal (if available) rather than a successful move:
-
Select the Refused check box next to the Tracking reason. A (refusal) Reason drop-down and Refused button display. The Move button is now hidden.
-
Select a Reason from the drop-down. This is required.
-
Click Refused. The Tracking page refreshes and the refusal is recorded in the inmate tracking history. The inmate location is NOT updated.
View Tracking History
To view the history of an inmate's movements to and from locations:
-
Click the expand arrow (
 ) for the Tracking History section.
The section expands to display tracking records for the inmate's current incarceration.
 -
To view the full tracking history for the inmate, or records for a different incarceration, select from the Tracking History drop-down list.
If the inmate is currently checked out to a location, the row displays highlighted in blue.
![]()
Admin Configuration Options
Admin > Global > Workflows
Configure workflows for managing the intake process.